HiPS tile drawing
One of the major part of the hips package is being able to draw HiPS tiles onto a larger sky image. This involves using projective transformation for computing and drawing a HiPS tile at the correct location. The discussion below is for the tile containing the galactic center pixel values. To achieve this, several steps are involved.
Computing boundaries of a HiPS tile
A tile is defined by four corners, hips uses the astropy_healpix.HEALPix.boundaries_skycoord function which returns the angle (\(\theta\) and \(\phi\)) in radians wrapped inside astropy.coordinates.SkyCoord class. This contains the four corners of a HiPS tile in the order (North, West, South, East). A snippet which computes the corners of a HiPS tile is provided below:
>>> import numpy as np
>>> from astropy.coordinates import SkyCoord
>>> from hips.utils import boundaries
>>> theta, phi = boundaries(nside=8, pix=450)
>>> SkyCoord(ra=phi, dec=np.pi/2 - theta, unit='radian', frame='icrs')
<SkyCoord (ICRS): (ra, dec) in deg
[( 264.375, -24.62431835), ( 258.75 , -30.        ),
 ( 264.375, -35.68533471), ( 270.   , -30.        )]>
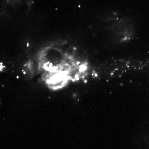
These are also referred to as HEALPix pixel corners. The returned latitude and longitude values (in degrees) are wrapped inside a list of tuples. The HiPS tile under discussion is shown below:
Computing HEALPix pixel indices
We also require HEALPix pixel indices which helps us in computing the boundaries for all the tiles. For this, hips provides a hips.utils.healpix_pixels_in_sky_image function which takes in a WCSGeometry object, order, and healpix_frame of the HEALPix map as parameter and returns a NumPy array containing the pixels.
>>> from astropy.coordinates import SkyCoord
>>> import healpy as hp
>>> from hips.utils import WCSGeometry
>>> from hips.utils import compute_healpix_pixel_indices
>>> skycoord = SkyCoord(10, 20, unit="deg")
>>> wcs_geometry = WCSGeometry.create(
...     skydir=skycoord, shape=(10, 20),
...     coordsys='CEL', projection='AIT',
...     cdelt=1.0, crpix=(1., 1.),
... )
>>> nside = hp.order2nside(order=3)
>>> compute_healpix_pixel_indices(wcs_geometry, nside)
array([176, 207, 208, 239, 240, 271, 272])
Applying projective transformation
Once the tile corners are computed, projective transformation is applied to the image. For this, the skimage.transform.ProjectiveTransform function is used. This function takes in two parameters, namely source and destination. The destination array values are constant, since hips_tile_width is always equal to 512. In general, the projective transform is given by a 3x3 matrix with 8 free parameters, however, in this case the estimate method is called which takes in two 4x2 arrays, i.e. 4 corners with each given by a longitude and a latitude.
The target position is calculated by multiplying this with the given matrix, i.e. the tile pixels. Thus, a HiPS tile is given as the destination parameter, which is done because the transformation works in an inverse manner i.e. it starts with the pixel coordinates in the output image, computes the corresponding coordinates in the input image, and then applies interpolation in the input image to compute the output pixel values.
Briefly, a HiPS tile is given as an input, and the output is the “normal” sky image.
from skimage import transform as tf
output = np.zeros((all_sky.shape))
src = wcs.wcs_world2pix(corners, 0)
dst = np.array([[511, 0], [511, 511], [0, 511], [0, 0]])
tform3 = tf.ProjectiveTransform()
tform3.estimate(src, dst)
output = output + tf.warp(text, tform3, output_shape=output.shape)
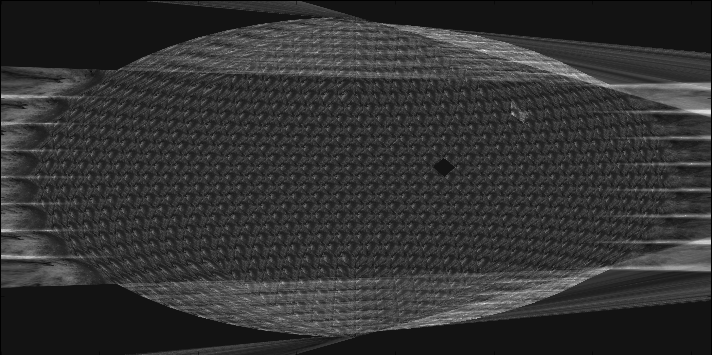
The resulting image is shown below:

The above image only shows a single tile being drawn onto an empty all sky image. As it can be seen, there are still some issues with tile drawing, for example, in this case, the same tile is always being drawn (that’s why one can’t see a sky image, just the pattern) and the handling of tiles at the “edge” of the sky image in this Aitoff projection. These issues will be resolved in the upcoming milestone.
The code for fetching a HiPS tile and drawing it using projective transformation can be found on this Jupyter notebook.